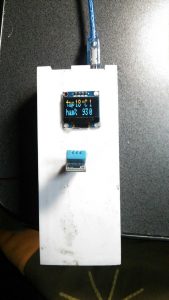
しばらくぶりとなりましたが、ハウスサイド巻き上げ機の記事の続きとなります。写真のコントローラーを動かすためのソフトウエアーとなります。これについても、まったくの素人ですので、先人の作ってくれたもののつぎはぎとなっています。そのために、バグがあったりするかもしれませんので試す場合は自己責任でお願いします。
アルディーノを利用して、コントローラーを動かすことになりますが、まずは、Arduino IDEを利用することになります。これは、すこし、面倒になりますが、基本的には、パソコンがあれば、無料で利用できます。
時間と興味のある方は、このサイトをご覧ください。私も、昨年の冬に、まったくわけのわからないながら、このサイトを利用していろいろなものを作ってみました。インターネットがつながっていればほぼ利用できるものばかりです。
Arduino IDEをダウンロードして、それで終わりでないところが少々面倒なところです。基本部分はこれだけですが、それに、利用するためのパーツを足していきます。それを、自分で組み込まなくては、目的のプログラムを動かすことはできません。今回のプログラムにも、いくつかのパーツを足していかなくてはいけません。
以下のパーツを先にインストールしてください。方法は、上のサイトで調べてください。
<SPI.h> https://github.com/PaulStoffregen/SPI
<Adafruit_GFX.h> https://github.com/adafruit/Adafruit-GFX-Library
<Adafruit_SSD1306.h> https://github.com/adafruit/Adafruit_SSD1306
“DHT.h” fruit_SSD1306.h> https://github.com/adafruit/DHT-sensor-library
<Vnh2sp30.h> https://github.com/cathug/monstermoto-library
ボードの設定は、arudhuino unoです。ソフトの書き込みなどについても、上のサイトから調べることができると思います。
次のプログラムは、モーターを制御して、ハウスサイドの上げ下げをするものです。
/*********************************************************************
This is an example for our Monochrome OLEDs based on SSD1306 drivers
Pick one up today in the adafruit shop!
——> http://www.adafruit.com/category/63_98
This example is for a 128×64 size display using I2C to communicate
3 pins are required to interface (2 I2C and one reset)
Adafruit invests time and resources providing this open source code,
please support Adafruit and open-source hardware by purchasing
products from Adafruit!
Written by Limor Fried/Ladyada for Adafruit Industries.
BSD license, check license.txt for more information
All text above, and the splash screen must be included in any redistribution
*********************************************************************/
#include <SPI.h> //各種の設定
#include <Wire.h>
#include <Adafruit_GFX.h>
#include <Adafruit_SSD1306.h>
#include “DHT.h”
#define DHTTYPE DHT11 //
DHT dht(DHTPIN, DHTTYPE);
#define OLED_RESET 3 //OLEDディスプレーの設定
Adafruit_SSD1306 display(OLED_RESET);
#include <Vnh2sp30.h>
// ENA A B PWM CS inv //モンスターシールド、モータードライバーの設定)
Vnh2sp30 mtrL( A0, 7, 8, 5, A2, 0); // Left side straight
Vnh2sp30 mtrR( A1, 4, 9, 6, A3, 1); // Right side reversed
boolean running = false; //
boolean wait = false;
#if (SSD1306_LCDHEIGHT != 64) //
//#error(“Height incorrect, please fix Adafruit_SSD1306.h!”);
#endif
void setup() { //設定
Serial.begin(9600);
Serial.println(“DHTxx test!”);
dht.begin();
display.begin(SSD1306_SWITCHCAPVCC, 0x3C); // initialize with the I2C addr 0x3D (for the 128×64)
}
void loop() { // 実行プログラム
display.display(); //I love Adafruit 😀
delay(1000);
display.clearDisplay(); // Clear the buffer.
float h = dht.readHumidity(); // Read temperature as Celsius (the default)
float t = dht.readTemperature(); // Read temperature as Fahrenheit (isFahrenheit = true)
float f = dht.readTemperature(true);
if (isnan(h) || isnan(t) || isnan(f)) { // Check if any reads failed and exit early (to try again).
Serial.println(“Failed to read from DHT sensor!”);
return;
}
Serial.print(“Temperature: “);
Serial.print(t);
Serial.print(” *C “);
Serial.print(“Humidity: “);
Serial.print(h);
Serial.print(” %\t\n”);
display.setTextSize(2); //OLEDディスプレー表示
display.setTextColor(WHITE);
display.setCursor(0,0);
display.println(“tmp”);
display.setCursor(40,0);
display.println((int)t);
display.setTextSize(1);
display.setCursor(70,0);
display.println(“o”);
display.setTextSize(2);
display.setCursor(80,0);
display.println(“C”);
display.setCursor(100,0);
display.println(running);
display.setTextSize(2);
display.setCursor(0,18);
display.println(“ham%”);
display.setCursor(70,18);
display.println((int)h);
display.setCursor(100,18);
display.println(wait);
display.display();
delay(1000);
// display.clearDisplay();
if (t >= 30 && running == 0) { //測定温度が30が度以上になったら左ハウスサイドを、半分開ける。
mtrL.run(1023); // Full speed forward
delay(240000UL); //モーターの回転する時間 調整する。
mtrL.stop(); //
delay(3000);
}
if (t >= 30 && running == 0) { // 右サイドを半分開ける。
mtrR.run(1023);
delay(240000UL);//モーター開店時間調整可能
mtrR.stop();
running = !running;
delay(3000);
}
if (t >= 35 && wait == 0) { // 35度で、サイド全開
mtrL.run(1023); // Full speed forward
delay(240000UL);
mtrL.stop();
delay(3000);
}
if (t >= 35 && wait == 0) { //同じく
mtrR.run(1023);右サイド全開
delay(240000UL);
mtrR.stop();
wait = !wait;
delay(3000);
}
if (t < 33 && wait == 1) { //33度に下がったら 右 サイドを半分下げる
mtrR.run(-600); //同じく東サイトを半分下げる。
delay(240000UL);
mtrR.stop();
delay(3000);
}
if (t < 28 && wait == 1) { //28度で、ハウスサイドを全部閉める
mtrL.run(-600); // Full speed forward
delay(240000UL);
mtrL.stop();
wait = !wait;
delay(3000);
}
if (t < 33 && running == 1) { 。
mtrR.run(-600);
delay(240000UL);
mtrR.stop();
delay(3000);
}
if (t < 28 && running == 1) {
mtrL.run(-600); // Full speed forward
delay(240000UL);
mtrL.stop();
running = !running;
delay(3000);
}
}
プログラムは、下記のサイトからダウンロードしてください。
https://github.com/gnakaii/oldmonterdht11
https://github.com/gnakaii/oldmonterdht11/blob/master/oled_dh11_monster1105.ino
上のサイトから、old_dh11_monster1105.inoファイルをダウンロードして、
Arduino IDE から開いてください。
前の記事 http://agatuma.com/wordpress/2018/11/page/2 http://agatuma.com/wordpress/2018/11/page/3/